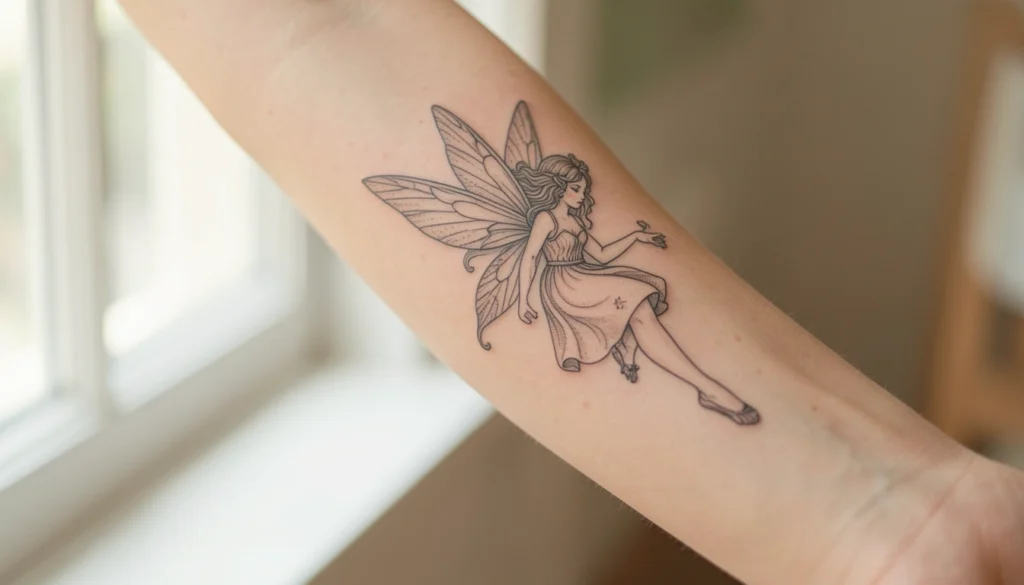
Delicate linework and gentle motion often define vintage fairy tattoo designs, because era specific illustrations rely on thin lines and subtle shading to convey whimsy. Choosing a drawing style matters when you want recognizable wings and readable facial features at tattoo scale.
Scale and placement change how much antique detail you can keep and how it will age on skin, so consider whether you want a small charm or a larger script like scene on thigh or rib. A compact fairy will need simpler lines while a larger piece can include flowers, stars, or a moon for context.
The gallery below compares twenty seven reference ideas and practical options so you can pick a direction and prepare artist questions. Use the notes under each pin to decide size, line weight, and any additions you want to ask your artist about.
27 vintage fairy tattoo design ideas and references
Woman flying through air
This sketch of a woman flying emphasizes motion and elongated limbs more than intricate wing detail. For a tattoo, that sense of motion reads well on the shoulder blade or upper arm where there is room to follow muscle contours. If you like the fluid pose, ask an artist to simplify clothing folds and keep line weight consistent so the figure reads at smaller sizes.
Floral portrait illustration
This mixed floral and face painting is useful if you want a fairy with an organic frame around her. The central face detail suggests placing the tattoo where a larger canvas exists such as the thigh or back. Discuss whether you want the flowers tattooed with soft gray shading or subtle color to preserve the vintage paper look.
Fairy on a flower with star
A small fairy seated on a bloom is a classic motif that scales well as an ankle, wrist, or rib tattoo. The added star gives a focal point you can emphasize with white ink or negative space. For crisp results, plan for slightly bolder outlines around the petals so the floral base does not blur as the tattoo ages.
Black and white fairy on a flower
This monochrome drawing relies on contrast and silhouette. It is a straightforward option if you prefer a simplified vintage look without color. Ask your artist about using dot shading for shadows rather than heavy black fills to maintain an illustrated feel.
Antique framed collage
An old fashioned collage with animals and objects reads like a small poster and can translate into a chest piece or upper arm wrap. Because the source contains many tiny elements, decide which motifs you want to keep and which can be removed to avoid clutter. Consider a single framed panel for a compact tattoo rather than every incidental detail.
Fairy on a flower silhouette
This simple black and white fairy sketch keeps focus on posture and wing shape. It is ideal for clean line work and will read well on forearm or calf. If you want to personalize it, think about adding a small leaf or initial near the stem rather than altering the figure too much.
Tree with perched fairy
A fairy integrated into a tree offers natural placement options like the upper back or side of the torso where vertical space is available. The tree provides a compositional anchor that helps with flow on curved skin. Discuss which branch detail to keep and whether you want leaves or a bare branch to set the mood.
Fairy holding a butterfly
The interaction between fairy and butterfly creates a storytelling moment that suits wrist, shoulder, or collarbone placement. For vintage effect, retain delicate wing veins and soft line shading on the butterfly. Ask the artist to outline the butterfly slightly darker to prevent it from blending into skin tone over time.
Fairy on cloud of stars
A fairy sitting above a cloud filled with stars reads like a small vignette and suits the upper arm or rib area. The stars let you play with negative space and tiny highlights. If you want a night time feel, subtle gray washes behind the cloud will separate the figure from skin without heavy color.
Pencil seated fairy study
This pencil sketch has soft edges and a contemplative pose that translates well as a gentle thigh or inner arm piece. Because shading is light, discuss how much of that subtlety can be kept in tattoo form. An artist may convert pencil tonal areas into stippling to keep the sketchy feel.
Fairy atop a tree
Perched fairies that use tree branches as seating have a natural vertical composition that suits the side of the torso or a calf. The branch can carry floral accents to connect with other tattoos. Request clear separation between the figure and the bark texture so the fairy remains the focal point.
Mermaid with butterfly detail
A mermaid with a butterfly on her back blends aquatic and fairy like elements and could become a unique thigh or rib piece. The combination suggests you can incorporate soft curves and flowing hair to reinforce movement. Decide whether you want scales detailed or suggested with light textural marks to preserve a vintage feel.
Moon and floral pairings
Two fairies with moon and flowers make for a balanced composition that reads well as a pair of matching forearm tattoos or a single wider back piece. The moon provides a graphic shape that can ground the delicate figures. If symmetry matters to you, mark out the spacing on skin before finalizing size so the moon and flowers do not overwhelm the fairies.
Branch top fairy vignette
A fairy sitting on a branch with flowers and leaves is a versatile motif that adapts to small or medium sizes. For compact tattoos, simplify leaf detail and keep petal shapes readable. If you prefer more atmosphere, request light stippling behind the branch to suggest depth without heavy black ink.
Thigh tattoo reference photo
This image showing a woman with a thigh tattoo is a practical reference for scale and placement rather than a specific design. Use it to visualize how a fairy sits with body curves and how much area a medium piece will occupy. Bring this kind of photo to a consult to show preferred size and location.
Arm placement example
A black and white arm tattoo image helps you see how a vertical fairy design fits the triceps area or the outer forearm. When adapting a flat illustration for a curved surface, artists adjust proportions to avoid distortion. Discuss whether you want portrait orientation or a wider vignette on the arm.
Thigh fairy in situ
A fairy shown on the thigh demonstrates how a larger illustration can incorporate surrounding flora and negative space to become a scene. Thigh pieces allow for more delicate detailing than small placements, but consider sleeping friction and clothing when planning fine linework. Ask about spacing so detail does not migrate under clothing pressure while healing.
Fairy holding flowers
This black and white drawing with floral elements is a clear template for a wrist or inner arm tattoo. Because the design mixes human figure and small blooms, you might request slightly bolder petal outlines to prevent soft petals from blurring together later. Bringing a printed copy helps your artist measure the right scale for clarity.
Two small fairy figures
Paired little fairies standing by flowers work nicely as matching wrist or ankle tattoos or as a set on the shoulder blades. When planning two tiny figures, make sure each has enough surrounding negative space to keep them distinct. Talk to your artist about spacing so the pair ages well as separate elements.
Sitting tinkerbell pair
Two tinkerbell style fairies on a branch suggest symmetry and story telling which can be scaled to a lower arm wrap or a chest piece. If you want mirrored poses, the artist may flip one figure and adjust wing shapes to maintain vintage realism. Define whether you want identical shading on both or mirrored contrast for variety.
Fairy with stars motif
A black and white fairy with stars is an economical way to evoke a vintage night scene without heavy composition. Stars and tiny sparkles can be added around the wings to give motion. Suggest micro white highlights or small dot work to separate wing veins from surrounding skin tone.
Collection of vintage motifs
This sheet of four mini motifs including flowers and stars is a good starting place for a flash style sleeve or for mixing and matching small tattoos. Use it to pick a consistent line weight and shading method across separate pieces. Ask for a unifying thread such as shared dot shading or similar petal styles to make the set cohesive.
Four line drawn fairies
A group of small fairy sketches on paper shows how variant poses offer options for different placements. If you want multiple tiny pieces, choose the pose that best fits the chosen area. For example, a reclining fairy works well on the foot arch while an upright fairy suits the forearm.
Tinkerbells with wing stars
Fairies with stars on the wings are a decorative detail that can be emphasized with small white ink dots or left as negative space. This makes a subtle difference in how the wings catch the eye. Decide early whether you want that sparkle effect since white highlights are less visible on darker skin tones.
Back and stomach placement idea
This image showing back and stomach tattoos is useful to understand how a fairy motif can integrate with other body tattoos. Consider how a central fairy might be flanked by smaller stars or floral elements to create visual balance across the torso. Bring your full body placement ideas to the consult so the artist can map transitions between pieces.
Angel like seated figure
An angel like figure sitting on a barrel leans more narrative and can be adapted into a fairy sitting on an object for story telling. Narrative scenes require more space to breathe so plan this as a medium to large tattoo. Work with your artist to choose which props to keep so the scene does not become cramped.
Grounded fairy sitting study
A grounded fairy seated on the ground gives a calm compositional option that suits the inner arm or lower leg. The sketch has simple shading which an artist can translate into stipple shading for a soft vintage look. If you want the drawing to read clearly at a smaller scale, ask the artist to reinforce the main contour lines.
How to plan and refine a vintage fairy tattoo design
Start by choosing the level of detail you want and the placement you prefer because that choice constrains line weight and shading. Tiny fairies need simplified outlines and clear negative space so wings and facial features remain legible, while larger pieces allow for facial detail, floral backgrounds, and subtle gradients. Bring several printed references that show both the pose and the tone you like so your artist can combine elements without guessing.
During the consultation discuss line weight, shading technique, and a healed look rather than pixel perfect copies of paper textures. Ask whether your chosen artist uses stippling, soft gray wash, or slightly bolder outlines to hold detail over time. Finally, agree on a size that leaves 10 to 20 percent breathing room around the design so you can later add small complementary elements like stars, a moon, or tiny flowers without reworking the original piece.
Frequently Asked Questions
A vintage fairy tattoo should be at least medium size to preserve fine detail. Small decorative fairies can work at wrist or ankle but will need simplification. For facial features, wing veins, and floral accents plan for a canvas roughly the size of a palm or larger so the artist can use thin but stable lines and shading techniques like stippling or light gray wash to maintain the delicate look while avoiding crowding that would blur over time.
Best placements depend on the composition and how much surrounding space you want to allow. Thigh, upper arm, ribcage, and back provide large flat areas for scenes and facial detail while forearm, calf, and shoulder blade work well for vertical figures. Think about movement of the skin in the area, clothing friction during healing, and whether you want the piece visible every day or easy to conceal. Bring placement photos to your artist so proportions are adapted to body curves.
Both color and black and white suit vintage fairy imagery, but the choice affects longevity and style. Black and gray line work with stippling keeps a true vintage illustration look and tends to age predictably, while soft muted color can reproduce the original paper painting feeling. If you choose color, ask for a muted palette of three to five complementary tones and plan for light touch ups later. If you prefer stark vintage contrast select black and gray shading with careful line weight decisions to maintain readability.
Adapting an antique illustration requires simplifying paper textures and translating pencil or watercolor marks into tattoo techniques. Start by choosing which elements are essential such as the pose, facial expression, or a single prop like a flower. The artist will likely convert soft shading into stipple or light gray wash and may thicken some contour lines for longevity. Bring the original image and be ready to identify which areas you want faithful and which can be altered for better skin readability.
Choose an artist with demonstrated experience in fine line, illustrative, or black and gray work because vintage fairies rely on precise line and subtle shading. Review each artist’s portfolio for clean contour lines, even stippling, and past pieces that remain readable after healing. During a consult, ask about their approach to converting paper textures into tattoo techniques and whether they prefer to redraw references so line weight and spacing suit human skin.
A vintage fairy tattoo will lose some fine detail over many years, especially in areas with more friction or sun exposure. The degree of change depends on ink density, line weight, your skin type, placement, and aftercare. To prolong detail, opt for slightly bolder primary outlines, avoid too many hairline interior marks, choose a protected placement like the upper arm or thigh, and follow sun protection and touch up guidance from your artist.
Combining fairies with flowers and moons creates a cohesive scene when you plan the negative space and scale deliberately. Place the fairy so it interacts with a flower or gazes toward the moon to create a narrative flow, and choose one dominant element with supporting motifs kept smaller. Use similar shading styles for all elements such as stippling for shadows and soft gray wash for volume. Discuss the balance with your artist so no single motif overwhelms the others at your chosen size.
Vintage fairy tattoo designs often become clearer when you narrow choices to style, placement, and scale. Save a small set of favorites that show the pose you like, the line weight you prefer, and the amount of floral or star detail you want. When you meet an artist, point to the specific parts of each reference you want kept or removed so the final custom work blends your favorite elements while remaining structurally sound on skin. The most useful next step is a consult with printed references and a size mockup on the area you plan to tattoo.